How to Activate iMessage: Complete Guide for iPhone, iPad, and iPod Touch
iMessage is Apple’s built‑in messaging service that lets you send texts, photos, videos, stickers, and even effects to other Apple users without using your cellular SMS plan. If you’re seeing a gray “iMessage” label, an “Unable to activate” alert, or simply can’t find the service after a new iOS update, this guide will walk you through the activation process, common roadblocks, and reliable fixes—including a step‑by‑step method using ReiBoot.
Why iMessage Might Not Activate Automatically
Most devices activate iMessage within a few minutes of turning the feature on. However, several factors can interrupt the process:
- Weak or missing internet connection (Wi‑Fi or cellular data).
- Incorrect Apple ID credentials or an Apple ID that isn’t verified.
- Carrier restrictions, especially on prepaid plans or when SMS/MMS is disabled.
- Out‑of‑date iOS software that lacks the latest activation servers.
- Temporary Apple server issues that affect large regions.
Understanding these triggers helps you target the right solution instead of trying random fixes.
Prerequisites Before You Begin
Make sure you have the following ready:
- Supported device: iPhone, iPad, or iPod touch running iOS 5 or later (iOS 12+ is strongly recommended).
- Active Apple ID: The same ID you use for iCloud, App Store, and FaceTime.
- Internet access: A stable Wi‑Fi network or cellular data connection.
- Carrier support: SMS messaging must be enabled on your plan because iMessage uses a verification text during activation.
Step‑by‑Step: How to Activate iMessage
Follow the steps in this video to activate iMessage quickly. Even if you don’t watch the video, the written instructions below mirror the same process.
- Open the Settings app on your device.
- Scroll down and tap Messages.
- Toggle the iMessage switch to the On position.
- If prompted, sign in with your Apple ID and password. Tap Sign In.
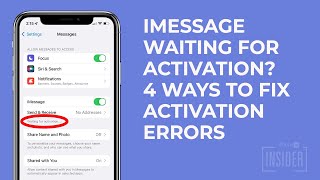
- Wait for the status bar to change from “Waiting for activation” to “iMessage Enabled.” This can take anywhere from a few seconds to a couple of minutes.
Once the green check appears, you’re ready to send and receive iMessages. If the status remains “Waiting for activation,” move on to the troubleshooting section.
Common Activation Errors and Quick Fixes
1. “Unable to Activate iMessage”
- Check that your device can receive SMS messages. Send a test text to another phone.
- Turn Airplane Mode on for 30 seconds, then off. This forces a network reset.
- Restart your device (Power button + slide to power off, then turn it back on).
2. “Activation Failed – Try Again Later”
- Switch from Wi‑Fi to cellular data, or vice‑versa, and retry.
- Update iOS to the latest version (Settings → General → Software Update).
- Sign out of your Apple ID (Settings → Messages → Send & Receive → Apple ID → Sign Out), then sign back in.
Having Trouble with iMessage? Detailed Troubleshooting
Are you experiencing an “iMessage activation error” after a recent iOS upgrade? Try these deeper steps before resorting to third‑party tools.
- Reset Network Settings: Settings → General → Reset → Reset Network Settings. This clears old carrier caches without deleting personal data.
- Check Date & Time: Ensure “Set Automatically” is enabled (Settings → General → Date & Time). Incorrect timestamps can block Apple’s activation servers.
- Verify Carrier Settings: Go to Settings → General → About. If a carrier update prompt appears, tap to install.
- Disable VPN or Proxy: VPNs can mask your IP address, causing Apple to reject the activation request.
- Use a Different SIM: If possible, insert a SIM from another carrier that supports SMS, then attempt activation again.
Fix iMessage/FaceTime Activation Error with ReiBoot
If the built‑in steps don’t resolve the problem, the third‑party utility ReiBoot can help. This video shows you how to use ReiBoot to clear the activation block without losing data.
- Download and install ReiBoot on a Windows PC or Mac.
- Connect your iPhone, iPad, or iPod touch to the computer via a USB cable.
- Launch ReiBoot and select Enter Recovery Mode. The software will guide you through the process.
- Once in recovery mode, choose Repair Operating System. ReiBoot will reinstall the iOS system files that handle iMessage activation while preserving your apps and data.
- After the repair finishes, your device will restart. Return to Settings → Messages and toggle iMessage back on.
Most users report successful activation within a few minutes after the repair. Remember that ReiBoot is a third‑party tool; always download it from the official website and back up your device beforehand.
Additional Tips to Keep iMessage Working Smoothly
- Keep iOS Updated: Apple frequently patches activation bugs in new releases.
- Maintain a Strong Cellular Signal: Even when using Wi‑Fi, iMessage still needs an SMS verification text.
- Regularly Sign Out/In: If you change Apple IDs or travel internationally, a quick sign‑out and sign‑in can refresh activation tokens.
- Monitor Apple System Status: Visit the Apple System Status page to see if iMessage services are down globally.
Conclusion
Activating iMessage is usually a matter of turning the feature on and waiting for Apple’s servers to verify your phone number. When the process stalls, the checklist above—starting with basic network checks, moving through iOS updates, and finally using ReiBoot—covers every reliable solution without resorting to unsupported hacks.
Follow the steps in this video, keep your software current, and you’ll enjoy seamless, encrypted messaging across all your Apple devices. If you still encounter issues after trying these methods, consider contacting your carrier or Apple Support for personalized assistance.