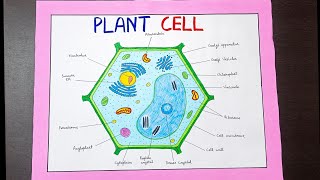
Coloring Page Of A Plant Cell: A Hands‑On Learning Tool for Biology Students
Understanding the structure of a plant cell is a cornerstone of secondary‑school biology. While textbooks provide detailed diagrams, many students retain information better when they can interact with the material. A plant cell coloring page combines visual learning with creativity, making complex concepts accessible and memorable. This article explains why coloring pages are effective, offers a step‑by‑step guide to drawing and coloring a plant cell, and lists free resources that complement classroom study.
Why Use a Plant Cell Coloring Page?
Research in educational psychology shows that active engagement—such as coloring, labeling, and drawing—enhances memory retention. For biology learners, a coloring page provides several specific benefits:
- Visual reinforcement: Coloring each organelle in a distinct hue helps students associate shape with function.
- Kinesthetic involvement: The physical act of drawing reinforces neural pathways linked to the subject matter.
- Cross‑curricular skills: Students practice fine motor control, color theory, and scientific notation simultaneously.
- Assessment readiness: Labeled diagrams prepared during study sessions serve as quick revision tools for exams such as CBSE Class 9, CBSE 2023, and IGCSE Biology.
Materials You’ll Need
Creating a high‑quality plant cell coloring page requires only basic art supplies. The following list mirrors the materials mentioned in popular tutorial videos:
- White drawing paper (A4 or larger)
- Black pen or fine‑tip marker for outlines
- Colourful gel pens, crayons, or coloured pencils
- Ruler (for straight lines and accurate dimensions)
- Optional: a light‑box or tracing paper if you prefer to copy a reference diagram
Step‑by‑Step Guide to Drawing a Plant Cell
- Outline the cell wall. Using a ruler, draw a large rectangle with slightly rounded corners. This represents the rigid cell wall that gives plant cells their shape.
- Add the cell membrane. Inside the wall, draw a second, slightly smaller rectangle. This thin line marks the semi‑permeable cell membrane.
- Place the nucleus. Sketch an oval near the centre and shade it lightly. Inside the nucleus, draw a smaller circle for the nucleolus.
- Insert chloroplasts. Draw several oval shapes scattered throughout the cytoplasm. Add tiny stacked lines inside each oval to depict thylakoid membranes.
- Draw vacuoles. Plant cells typically have a large central vacuole. Sketch a big, irregular shape that occupies a significant portion of the interior.
- Include mitochondria. Add a few bean‑shaped organelles with squiggly inner lines to represent the cristae.
- Show the endoplasmic reticulum and Golgi apparatus. Use a series of connected loops for the rough ER and a stack of flattened sacs for the Golgi.
- Label each organelle. Write the name of each structure in a clear, legible font. Use a ruler to keep labels aligned and avoid overlapping lines.
Coloring Tips for a Professional‑Looking Diagram
- Consistent colour coding: Assign a specific colour to each organelle (e.g., green for chloroplasts, purple for the nucleus). This consistency aids quick identification.
- Use shading: Apply a slightly darker shade along the edges of each organelle to create a three‑dimensional effect.
- Highlight the cell wall: Colour the wall a light brown or beige and add a subtle texture to suggest rigidity.
- Include a legend: At the bottom of the page, list each colour with its corresponding organelle. This mirrors the format used in many textbook diagrams.
Integrating the Coloring Page into Classroom Activities
Teachers can use the plant cell coloring page in several instructional formats:
- Homework assignment: Students complete the drawing at home, reinforcing the lesson taught in class.
- Group competition: Small teams race to colour and label the most accurate diagram, fostering collaboration.
- Quiz preparation: The completed page serves as a quick reference during revision sessions for exams such as the CBSE board or IGCSE.
Online Resources to Complement Your Coloring Page
For students who want additional practice, the following free resources align well with the plant cell diagram:
- Video tutorial on drawing a plant cell – The creator walks through each step, demonstrating pen pressure and colour blending techniques. The video is tagged with #esartcraft and includes tips for both beginners and advanced artists.
- IGCSE Bio practice questions – A collection of multiple‑choice and short‑answer questions that test knowledge of organelle functions, perfect for self‑assessment after completing the coloring page.
- Search for “Animal cell and Plant cell easy diagram #class9 #biology #cbseboard #cbse2023 #science” on video platforms to find comparative videos that highlight differences between animal and plant cells, reinforcing the unique features you have coloured.
Adapting the Coloring Page for Different Learning Levels
While the basic diagram suits Class 9 learners, you can increase complexity for higher grades:
- Add detailed sub‑structures: Include the plasmodesmata, peroxisomes, and ribosomes for advanced students.
- Introduce functional annotations: Write brief notes beside each organelle describing its role in photosynthesis, respiration, or storage.
- Integrate comparative analysis: Place a small animal cell sketch beside the plant cell and colour both, highlighting the presence of a cell wall and chloroplasts only in the plant cell.
Conclusion
A well‑crafted plant cell coloring page is more than a creative pastime; it is a powerful educational tool that bridges visual learning, hands‑on practice, and scientific understanding. By following the step‑by‑step guide, using simple materials, and incorporating colour‑coding strategies, students can produce a diagram that serves both as a study aid and a showcase of their artistic effort. Coupled with free online videos and practice questions, this activity prepares learners for success in CBSE, IGCSE, and any future biology coursework.