Mastering the Butterfly Cut Out Pattern: A Comprehensive Guide
The butterfly cut out pattern has become a staple in both fashion and craft design. Whether you are looking to revitalize an old t-shirt, create intricate paper art, or design a custom garment, the butterfly silhouette offers a timeless balance of symmetry and elegance. Because the shape is organically curved, it provides a visually appealing contrast to the straight lines often found in standard clothing and stationery.
Choosing the Right Material for Your Pattern
Before you begin cutting, it is essential to select a material that supports the structural integrity of the butterfly shape. Depending on your project, your choice will vary:
- Fabric: For clothing, stable knits or cotton blends work best. If you are performing a cut-out on a t-shirt, ensure the fabric has enough recovery so the edges do not sag.
- Paper: Cardstock or heavy-weight construction paper is ideal for 3D models or scrapbooking.
- Leather or Vinyl: These materials are excellent for accessories and do not require hemming, making them perfect for clean-edge butterfly designs.
How to Create a Basic Butterfly Template
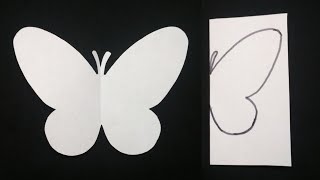
To achieve a professional look, you should always start with a template rather than free-handing the design. This ensures that the left and right wings are perfectly symmetrical.
- Draw the Center Line: Draw a straight vertical line on a piece of scrap paper. This represents the body of the butterfly.
- Sketch One Side: Draw the upper and lower wings on only one side of the line. Focus on creating a fluid, sweeping curve for the top wing and a smaller, rounded curve for the bottom.
- Fold and Cut: Fold the paper along the center line and cut through both layers simultaneously. When you unfold the paper, you will have a perfectly symmetrical butterfly cut out pattern.
- Refine the Edges: Use small scissors to trim any jagged edges or to add "antenna" details to the head.
Applying the Pattern to Fashion and Clothing
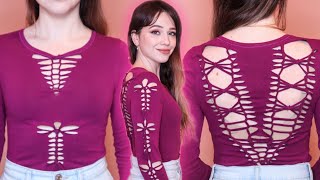
Incorporating a butterfly cut out into apparel is a popular way to add a "magical" touch to simple outfits. There are two primary ways to implement this design: the negative space cut-out and the appliqué patch.
The Negative Space Cut-Out
This technique involves removing fabric from a garment to create a window in the shape of a butterfly. This is most effective on the back of a dress or the shoulders of a t-shirt.
Steps for Clothing Cut-Outs:
- Pin the Template: Place your paper butterfly pattern on the fabric and secure it with pins.
- Mark the Boundary: Use a fabric marker or tailor's chalk to trace the outline.
- Careful Cutting: Use sharp fabric shears to cut inside the line. Pro tip: Leave a tiny margin of extra fabric if you plan to sew a finished edge.
- Finishing the Edge: To prevent fraying, you can use a zigzag stitch, a satin stitch, or a fabric glue sealant.
The Butterfly Appliqué
If you prefer to add a butterfly rather than remove material, the appliqué method is the best choice. This involves sewing a butterfly shape made from a different fabric onto a base garment.
Sewing Tips:
To sew these magical shapes securely, use a fusible web. Iron the web onto the back of your butterfly fabric before sewing it to the shirt. This prevents the fabric from shifting while you stitch around the curved edges.
Creative Variations for Paper and Crafting
Beyond fashion, the butterfly cut out pattern is widely used in home decor and education. For those interested in paper crafts, you can experiment with layering. By cutting three butterflies of different sizes