Creative Ideas for Atmosphere Projects: A Guide for Students
Understanding the Earth's atmosphere is a fundamental part of earth science. For students, creating atmosphere projects is an effective way to visualize the invisible gases that surround our planet and protect life. Whether you are building a physical 3D model or creating a detailed scientific drawing, the goal is to illustrate the distinct layers and their unique characteristics.
The Core Concept: The Five Layers of the Atmosphere
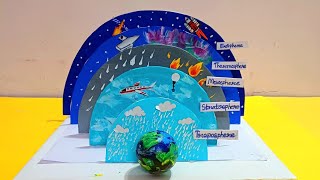
Before starting any project, it is essential to understand the scientific data. The atmosphere is not a uniform blanket of air; it is divided into layers based on temperature changes and chemical composition. Most school projects focus on these five primary layers:
- Troposphere: The lowest layer where all weather occurs and where humans live.
- Stratosphere: Home to the ozone layer, which protects Earth from harmful UV radiation.
- Mesosphere: The middle layer where most meteors burn up upon entry.
- Thermosphere: A high-temperature layer where the International Space Station (ISS) orbits.
- Exosphere: The outermost edge that gradually fades into the vacuum of space.
How to Build a Layers of the Atmosphere Model
A physical model is often the most engaging way to present this information. Depending on the materials available, there are several ways to approach a layers of the atmosphere model for school projects.
1. The 3D Cylinder Model
Using a recycled cardboard tube or a clear plastic cylinder, students can represent the atmosphere vertically. By painting the interior of the tube in different colors—transitioning from a deep blue at the bottom to black at the top—you can visually demonstrate the thinning of the air.
Pro Tip: Use cotton balls to represent clouds in the troposphere and small glitter or foil pieces to represent satellites in the thermosphere.
2. The Layered Jar Method
For a more artistic approach, use a tall glass jar. Fill the jar with layers of colored sand, dyed salt, or different densities of liquids. Each layer should correspond to one of the atmospheric levels. Labeling the jar with a permanent marker or adhesive stickers ensures the scientific data is clear to the viewer.
3. The Diorama Box
A shoebox turned on its side allows for a cross-section view. Students can hang elements from the "ceiling" of the box using fishing line. For example, a small paper airplane can be suspended in the stratosphere, while a meteor can be placed in the mesosphere.
Creating a Professional Atmosphere Drawing
If a physical model isn't feasible, a detailed scientific drawing or infographic is a powerful alternative. To make a high-quality layers of atmosphere drawing, follow these steps:
- Scale the Height: While it is difficult to draw the atmosphere to a perfect scale, ensure the troposphere is the smallest section and the thermosphere/exosphere are significantly larger.
- Color Coding: Use a gradient of blues. Start with a bright sky blue for the troposphere and move toward a dark navy or black for the exosphere.
- Annotate Key Features: Don't just name the layers. Add labels for the ozone layer, commercial jet paths, and auroras.
- Use Printables: To ensure accuracy, many students utilize printable templates from educational websites to get the proportions correct before coloring.
Essential Materials for Your Project
To get started on your project, gather the following common household and craft items:
- Base Materials: Cardboard, poster board, or clear plastic containers.
- Coloring Tools: Acrylic paints, markers, or colored construction paper.
- Adhesives: Glue sticks, hot glue, or double-sided tape.
- Decorative Elements: Cotton balls (clouds